Buying and Installing a new Garbage Disposal
Sooner or later you'll want to replace or upgrade your kitchen garbage disposal. Older ones may wear out or you may want to upgrade to one with more power or features.
There are two major manufacturers of disposals Anaheim (Waste King™ brand) and Emerson (Insinkerator™ brand). Either may also be sold as a store brand. Both are of good quality though some folks prefer one over the other. The main difference for this project is the coupling type.
Purchase Considerations
Things to consider when purchasing a replacement disposal include:
- The coupling type. If you purchase the one with the same coupling type, you may not have to replace the coupling which joins the disposal to the sink. If your still looks good and doesn't leak, resung the coupling can save on installation hassle. There are two common coupling types. The Emerson uses three attach points with the disposal, and sinches to the sink with three screws tightened uniformly. The Anaheim type attaches to the disposal with two attach points (and may be easier to get on as a result) and sinches down a colar that screws around the drain.
Further, the Emerson coupling is held together by a metal ring, that can be pryed off with a screwdriver. The Anaheim is held together with a rubber gasket removed by hand. 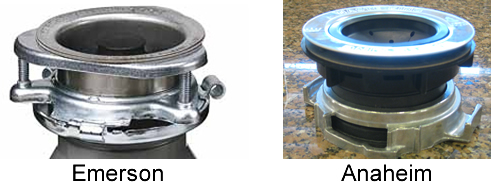 a
a- Electrical Connection. If your current disposal has a plug, then you'll want to buy one that also comes with the plug as well. If it does not, the job of connecting a plug cord to it is not difficult - but it's not covered in our video here. If your current disposal is hard wired, then you'll want to duplicate that on your new disposal. It won't matter what the new disposal comes with as you'll be wiring the new one like the old one. You may need some minor electrical connection parts.
- Discharge distance. The configuration of your current disposal and the new one may not be identical. The included drain pipe may be slightly different. You might be able to use the included drain pipe, you may need to resue the drain pipe from the previous installation (we did in this video) or you may need a trip to the hardware store to find one of the proper geometry.
- Horsepower vs. RPM. Despite certain claims, horsepower is not as significant of a performance factor as RPM. A 2600 RPM disposal will do a better job of taking care of food waste than a 1700 RPM disposal. Higher quality disposals with more features, however, may also happen to have more horsepower (more than ½ HP)
- Stainless Steel Components.
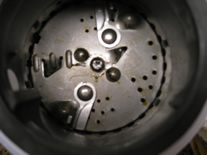 A quality disposal will have all three members of the grinding chamber made of stainless steel. The walls, the plate, and the clubs (aka:blades).
 - Warranty. Higher quality disposals will have a longer warranty and tend to last longer. Consider also whether the warranty an "over the counter" or "under the counter" warranty. The difference being if you'll have to bring the disposasal to the service center or if the service technition will come to you to service the unit in place under your sink.
Removing the old disposal
Prepare the sink area with a towl and basin to catch waste water. You may also want to remove some cabinet doors for easier access ( I did). Disconnect the power, and remove the dishwasher hose with a 5/16" nut driver and two bolts on the discharge tube with a 3/8" nut driver.
Release the disposal from the coupling, and be ready for it to drop. For the Emerson type, a screwdriver or disposal tool can be used to twist the disposal to remove it from the coupler.
If you're not reusing your coupling, remove and replace the coupling. See the video for instructions on dealing with each type of sink coupling
Preparing the new disposal
If you have a dishwasher you need to punch out the plug that comes installed in the dishwasher inlet of the disposal. A screwdriver, punch or similar tool can be used to knock the plug into the grinding chamber where it can be retrieved by hand.
Prepare the electrical wiring according to your installation needs. If you need to wire a plug cord to the disposal, the disposal's white (common) wire goes to the ribbed half of the cord.
Install the discharge tube onto the disposal. Depending on the configuration and flexibility of your current under-sink pipes, and whether they are slip jointed or solvent gluded in place, you may need to make adjusutments to that plumbing.
Installing the new disposal
Drop the discharge tube into the drain pipe. Rotate the disposal until the unit lines up with the sink coupling. Insert the disposal into the coupling and ensure it is tight, then tighten the slip joint nut on the drain pipe. Connect the dishwasher discharge hose and tighten the clamp.
Turn the power back on and test the disposal. Then fill the sink half way with water and turn the disposal on while checking for leaks.
| Time to complete | 1 hour |
| Materials | New disposal package |
| Tools | pliers or channel locks, 5/8 and 3/8 nut driver, plumbers putty, screwdriver (possibly with a Torx head). Electircal nippers may be necessary if wiring is required. |
| Skill level | medium |