How to Replace a Faucet Aerator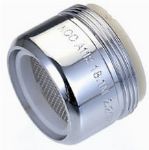
Sooner or later the aerator on every faucet gets clogged with debris and or calcium deposits.
In this video, Greg demonstrates how to remove and replace the aerator on any sink faucet. Also demonstrated are the two types of thread configurations (male and female) and several other variations, and how to apply silicone lubricant so that future maintenance doesn't require any pliers!
Many aerator designs are proprietary. Trying to find just the right replacement cartridge to match the outer metal ring can be frustrating. Cartridges that appear to be the correct size may not fit at all, or may hang out the bottom and not work properly as a result.
The easier approach is to simply replace the entire unit. Bring the removed aerator to the home center/hardware store to match the thread types. In this way, you don't have to worry about the cartridge fitting properly or being put back together in the right order.
Some replacement aerators have both male and female threads - that is, threads on the outside as well as the inside of the metal ring, for more universal application. There are also adapter rings to allow combining sink fittings and aerators that would otherwise not fit together.
| Time to complete | 10 min |
| Materials | New aerator assembly, silicone lubricant |
| Tools | pliers or channel locks |
| Skill level | easy |