 How to Repair a Delta Shower/tub Valve
The Delta shower valve is a very popular valve for home installations. It is one of the most common valves, virtually unchanged over the years.
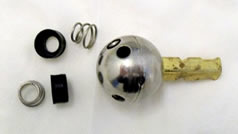 The inner workings of the Delta valve is a ball with holes that line up with holes in the valve body. Both plastic and stainless steel balls are made, I prefer the stainless steel variety.
On the valve body side, rubber cups are held against the ball with small springs. Your replacement kit may come with a variety of spring shapes. Use the ones that match those that you took out.
1) Identifying the Delta shower valve: Look for a Delta logo. (if yours is a Moen, or Price Pfister, then it is not a Delta) The Delta valve comes in a variety of finishes, but all turn on by pushing the valve handle up. Rotating the handle left and right controls the temperature. Full hot is about 270° of rotation from off. If it's a tub & shower installation you'll have an additional button to select tub or shower operation.
 2) Purchase a replacement kit. Don't go for the cheap import. I prefer the stainless steel variety of the ball valve. The kit may come with more parts than you need in order to accommodate several models. In this case, having extra parts after the repair is OK. .
3) To make it easy, purchase the Delta Cup Tool. I'll show you how to do with with and without this handy little tool, but it's definitely easier to remove and insert the cups and springs with this handy device. If you don't want to buy it, or can't find it, I'll show you how to use a plain old Phillips screwdriver to get the job done.
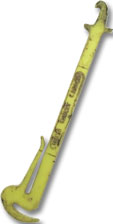
You'll also need a Delta Valve Spanner (a.k.a. Delta Valve Wrench) to adjust the tightness of the handle operation once it's put back together.
Since most showers don't have a separate shut off (like a sink or toilet) you usually have to shut the water off to the entire house until the repair is complete. So, have everything you need or might need ready, just in case.
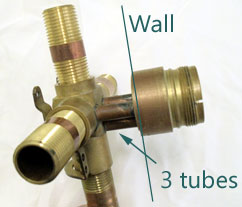
A word of caution: The valve body is suspended in the wall by three copper tubes. If you use excessive force to try to take the front dome shaped cover of the valve off, you can damage the 3 tubes and tear the valve body right out of the wall! This is going to be very expensive to fix - and you'll be without water in the house the entire time! In the video I'll show you how to remove the valve dome correctly - without damaging the valve body - and how to use a silicone paste to make sure it comes off easy next time too. If you scratch the dome in the process, don't worry, you can buy another one at the store.
Now you're ready to continue with the actual repair, which are shown in the video in the following steps:
- Shut off the water to the house & open a faucet to relieve pressure
- Remove the button in the middle of the handle (use a small knife if necessary)
- Remove the screw holding the handle on
- VERY CAREFULLY unscrew the dome. Use channel locks if necessary - avoid excessive force! If the dome does not unscrew easily see the video for techniques on how to unscrew it.
- Remove the plastic cover and rubber washer that was held in place by the dome
- Remove the valve ball
- Use the Delta valve tool or a Phillips screwdriver to remove the cup and spring set in the top two holes (the bottom center hole does not have one).
- Re-assemble in reverse order using a food grade silicone paste on the replacement cups and springs. The kit may come with several versions of cups and springs. Use the ones that match the ones you removed.
- Insert the ball, with the two holes on the top side
- Re-assemble the washer and plastic cap (a tab on the cap fits a groove in the valve body
- Apply silicone paste to the dome threads and then replace the dome
- Use a Delta valve spanner to tighten the collar inside the dome hole so that the valve operates smoothly, but doesn't fall to the OFF position on its own.
- Replace the handle. The screw hole is offset from the handl's center, so check for proper orientation.
- Turn the water back on (gently)
- Test valve operation
- Replace the handle button
| Time to complete | 20 min |
| Materials | towels, Delta valve kit, silicone paste |
| Tools | pliers or channel locks, Phillips screwdriver, Delta cut tool, Delta valve spanner, flashlight |
| Skill level |
Please support this website by clicking on an advertisement. They pay me so you don't have to!